The product team at WebEngage constantly strives to make the WebEngage dashboard experience easier or simpler. So after taking our customers’ feedback and understanding their requirements, we’ve made some improvements to the WebEngage dashboard.
Through the first half of 2020, we rolled out a multitude of features and improvements across channels, SDK, data management, and campaign reporting sections on the WebEngage dashboard. Here’s a rundown of the releases!
- New features released across channels on the WebEngage dashboard
- New features released across the Campaign Reporting section
- New features released across the Data Management section
- Update on Mobile SDKs
A. New features released across channels on the WebEngage dashboard
1. Integrate WhatsApp Service Providers (WSP) of your choice
We launched WhatsApp as a channel of engagement last year on the WebEngage dashboard. The release helped our customers in starting instant conversations with the end-users gradually strengthening their multi-channel user engagement strategy.
We initially facilitated the integration with Infobip as a WhatsApp Service Provider (WSP), and now we have added an out-of-the-box integration with Gupshup as well.

Further, we have also added support functionalities for the concepts of Private WSP and Self-service WSP, which means:
- If you’re a client who is passing hashed phone numbers to WebEngage or want to integrate your own WSP with WebEngage, you can do so using the private WSP functionality.
- If you’re a WhatsApp Service Provider and want your company to show up as a supported WSP for all WebEngage clients in our dashboard, you can do so using the self-service WSP functionality.
Web Push Notifications
1. Add a custom Badge to your web push notifications
If you’re targeting a large number of Android users through Web Push notifications, then you can easily choose to replace the Chrome badge with a custom badge that resonates with your brand.
Note: This is only applicable to Android v6+ users on Chrome v56+ currently.
![]()
How does adding a Badge help?
Replacing the Chrome icon with your brand’s icon helps in building the brand authenticity, top-of-the-mind recall, and acts as a gentle reminder for your users to check the notification that you send.
Check out our Knowledgebase to find out how you can set a custom badge for your web push notifications on the WebEngage dashboard.
2. Set up Web Push opt-in prompts that are more contextual and user-sensitive (for Chrome and Firefox users)
Earlier this year, Google Chrome and Mozilla Firefox made changes to the way users experience Web Push opt-in prompts. These changes were done in order to make the web browsing experience seamless by reducing the frequent blast of permission requests. They also addressed the troublesome trend of prompting users on their first visit, instead of nudging them at contextually relevant moments.
Here’s briefly what changed: Quieter opt-in prompts are now auto-enabled in the following scenarios for Chrome 80+ users: A) for users who typically block opt-in prompts and B) for websites with very low opt-in rates. Users can also switch to the new quieter opt-in prompt UI manually in their browser settings. And Firefox 72+ requires user interaction to show web push opt-in prompts. Prompts without interaction only show a small icon in the URL bar.

What should you do?
To avoid the risk of having your website’s web push opt-in prompts blocked by the latest versions of Chrome and Firefox, we recommend changing the opt-in prompt type to Box/Bell/Custom by going into Channels > Web Push configuration section of your account. More details in our documentation.
In-App Messages
1. Send targeted in-app messages to multiple apps through a single campaign
Similar to app and web push notification campaigns on the WebEngage dashboard, you can now select specific apps and deliver your in-app messages to the selected apps through a single campaign.

For instance, if you are sending an in-app message asking for feedback to all users across several different mobile apps that your brand has, you could create one campaign and deliver the in-app message across all the apps that you’d like to target!
2. Send in-app notifications in landscape mode
We have updated Xamarin and Unity SDKs to enable in-app notifications in landscape mode. Now you can provide a seamless experience to your users while they use your app in landscape mode as well.

App Push Notifications
1. Deliver your one-time app push notification campaign at the best time to your users by leveraging the Send Time Optimization feature
While scheduling a one-time push notification campaign for a future date, you can now let our system decide the best time to send the campaign on that particular date to your users.
The WebEngage system identifies the user’s best time slot (whether it’s morning or evening) to send the notification depending on their interactions with your previous campaigns.

How does the Send Time Optimization feature help you?
Using the Send Time Optimization feature helps you to improve your app engagement by having your app push notification smartly delivered to the user at the best time detected based on their previous interactions.
Send Time Optimization is currently available in BETA, so if you’re an existing customer who’d like to leverage it, please get in touch with your Success Manager or write to support@webengage.com
B. New features released across the Campaign Reporting section
1. Use Tags to organize and analyze your campaigns
Tags are keywords that you can apply to your campaigns and journeys on the WebEngage dashboard, to categorize them by topic, business vertical, target audience, purpose, and more.
For example, if you have a few campaigns for recovering abandoned carts, you can add a ‘Cart Abandonment’ Tag to each of them; and access an organized list of ALL the cart abandonment related campaigns in one place.
You can further break the list down by attributes like opens, clicks, conversions, and revenue to answer questions like ‘what % of revenue comes from returning customers’ or ‘which marketing channel has been most successful in recovering carts this month’.

How do Tags help you?
Applying Tags to your campaigns and journeys helps you organize your campaigns based on your goals/objectives, and search your content faster leading to enhanced agility across various teams.
By applying Tags, you can also analyze and compare the performance of campaigns across business verticals and discover the high-performing channels to get a deeper understanding of your customers’ behavior.
Here’s everything you need to know about Tags.
2. Filter your List of Journeys at a deeper level
You can now filter and split your List of Campaigns and List of Journeys by Campaign Type, Status, and Tags, allowing you to focus on campaigns that matter the most to you.
For example, you can check how is the click-through rate of all the campaigns under the “Onboarding” Tag with respect to the “Incentive” journeys? You’d be able to filter it using the custom-defined Tags.
3. Download A Consolidated And Historic Campaign Report Across All Channels
You can now download a collated report that covers ALL your campaigns across all the engagement channels from the Engagement Overview page. The maximum time period allowed here is 1 year. The same maximum time period is applicable for campaigns on a specific channel.
How does it help?
Downloading collated reports helps you save time and frees up your bandwidth providing access to all the reports in one go.
4. Download or schedule variation level data in reports
Besides the reports that you usually download or schedule on a campaign level, you can now download and schedule reports to include the performance data at a variation level as well.
Additionally, you can now access the performance data of the campaign variation that you might have deleted earlier.
How does this help?
By getting the performance data of each of the existing or deleted variations that you must’ve created on the WebEngage dashboard, you could quickly analyze the impact and engagement for multiple variations through these reports. And plan your subsequent campaigns based on this data.
5. Perform deeper analysis of your campaigns with the improved reporting format
We’ve added a set of new columns to the campaign reports to make your campaign analysis experience seamless and actionable. When you download the campaign reports, you’ll now be able to access a detailed rundown of your campaign performance through the data in the new columns including the campaign title, message, primary CTA links, the SSP/ESP/WSP and a lot more.

How does it help?
With insights like campaign title, message, primary CTA links, the SSP/ESP/WSP it’s being sent – it makes it easier for your product and marketing team to instantly figure out what worked and what didn’t at a deeper level.
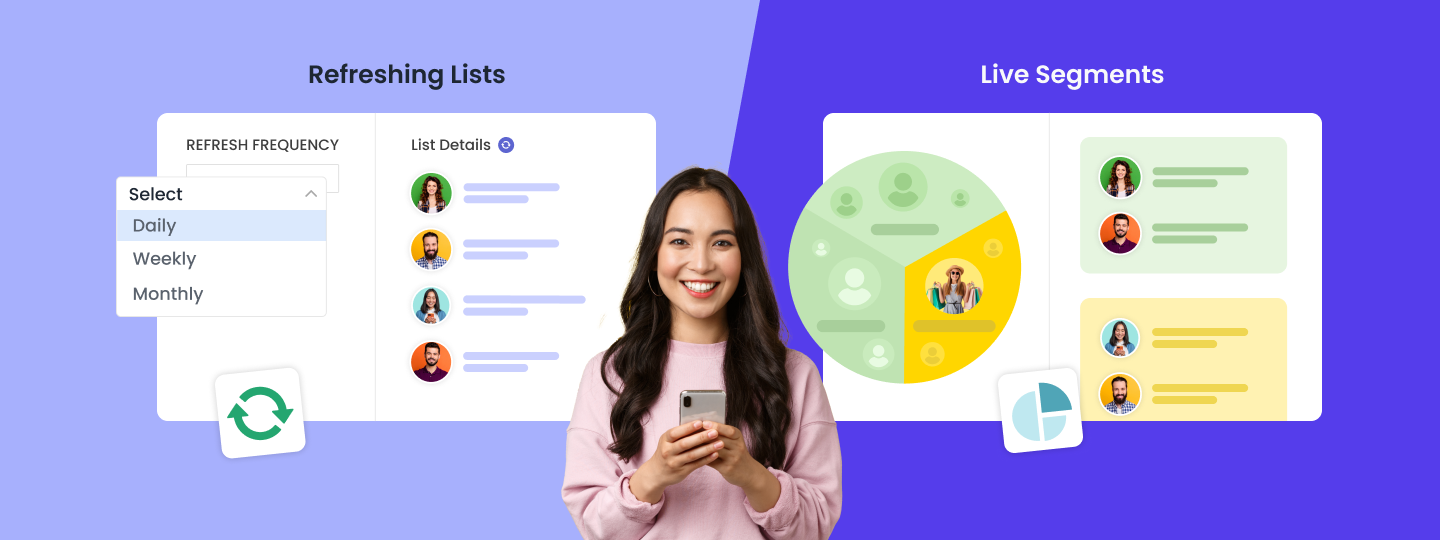
6. Create Static Lists based Segments to target specific users
You can now send campaigns to a very specific list of users (in addition to live segments) directly through the Segment editor. You can create a Static List via the segment editor or directly via a CSV containing a list of user IDs. The Static List segment does not let any additional users move in or out of the segment.

How do Static Lists help you?
Static lists significantly reduce the brewing time and can be used while creating those one-off standalone campaigns.
Note: It’s a BETA feature, so if you’re an existing customer who’d like to use Static Lists please get in touch with your Success Manager or write to support@webengage.com
C. New features released across the Data Management section
1. Additional error information
When you hover on an event/user attribute whose status is Error it will now show additional information like page URL/screen name, the value which resulted in an error, data type of the erroneous value, etc.

2. Attribute limits utilization
You can now check how many user attributes and event attributes are currently utilized in an account. This information is shown under the User Profile Attributes and Custom Events sections.


3. Complex attributes (Array/Map) now support the following actions: Stop/Start Tracking, Change Data Type, and Mark as PII.
D. Update on Mobile SDKs
Earlier this year Google changed the way app install and acquisition information gets passed to apps/third party SDKs like WebEngage. So to ensure that the App Installed event or First Acquisition Details data isn’t impacted for any of the existing WebEngage clients we rolled out a new version of our SDK and suggested some necessary steps for smooth operation. If you’d like to know more about this update, get in touch with us.
***
If you have any queries or you’d like to try out any of the above features for yourself, feel free to get in touch with us!
The next half of the year is going to get a lot better for the WebEngage users! Stay tuned!
 Ananya Nigam
 Harshita Lal