A common trend we’ve seen over the years is that everyone starts carefully with running marketing campaigns, maintaining campaign reports, performing weekly rundowns, etc. But over a few months, teams become more relaxed on the maintenance and upkeep. They start running hundreds of campaigns with no one particular person reviewing the campaign performance and updating the reports.
This is worrisome because it causes you to simply sit on tonnes of data and not utilize it to understand your users better and refine your marketing campaigns.
Tags give you the power to declutter your marketing campaigns for faster access and improved campaign analysis. It is a small addition, but once utilized, it turns WebEngage Campaign Analytics into one of the most powerful tools to drive your business forward.
In this article, I’ll show you how to create Tags on the WebEngage dashboard and how to use them to get better campaign insights.
- What are Tags, and how can you use them?
- Benefits of Tags
- Organize your campaigns based on your campaign goals/objectives
- Analyze and compare the performance of campaigns across business verticals
- Discover the high-performing channels
- Get a deeper understanding of your customers’ behavior
- Enable agility across various teams
- Search for content faster and save time
What are Tags, and how can you use them?
Tags are keywords that you can apply to your campaigns and journeys on the WebEngage dashboard, to categorize them by topic, business vertical, target audience, purpose, and more.
For example, if you have a few campaigns for recovering abandoned carts, you can add a ‘Cart Abandonment’ Tag to each of them; and access an organized list of all the cart abandonment related campaigns in one place.
You can further break the list down by attributes like opens, clicks, conversions, and revenue to answer questions like ‘what % of revenue comes from returning customers’ or ‘which marketing channel has been most successful in recovering carts this month’.
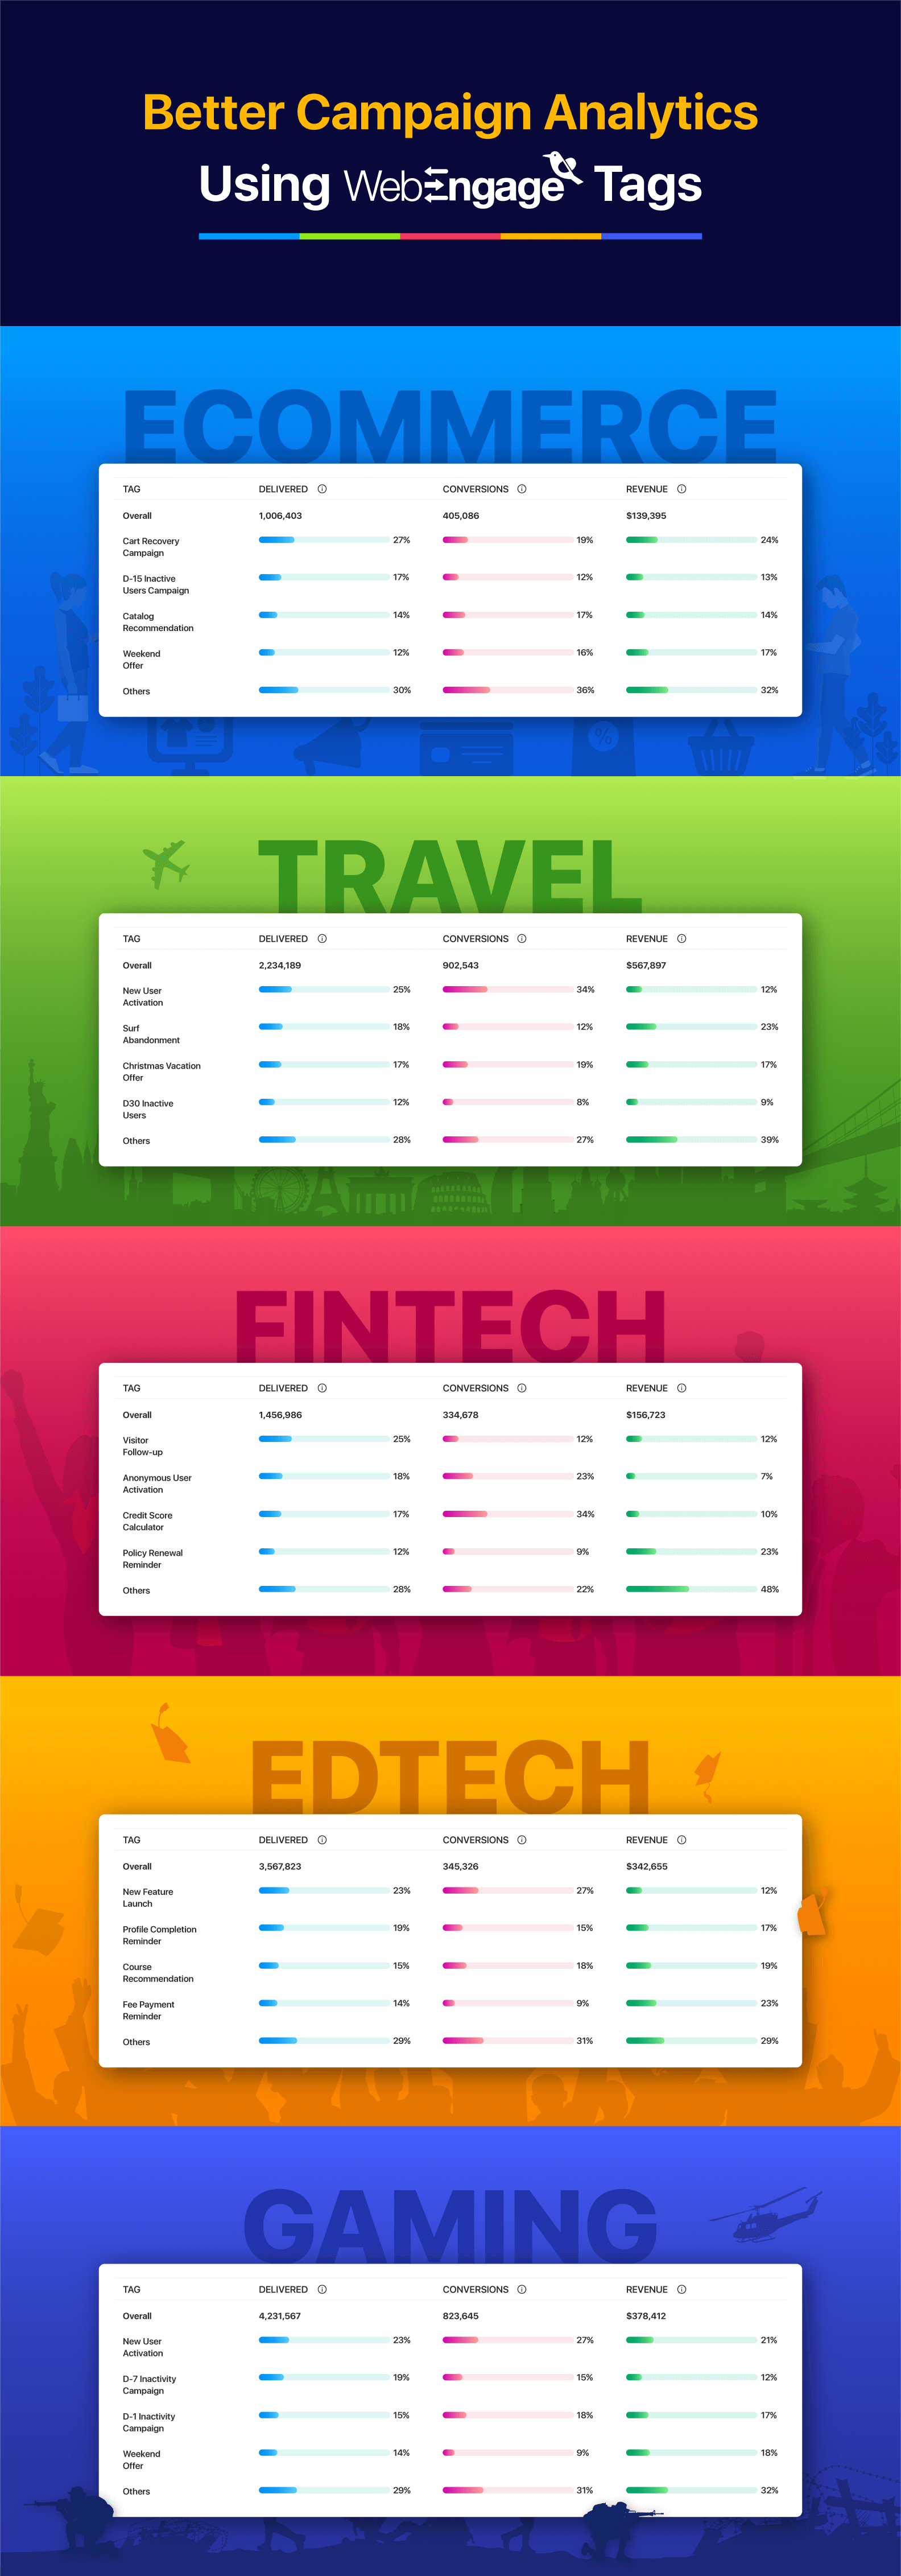
Further, all the campaigns under the Overview pages can now be split by:
- Tags (topic, target audience, purpose, etc.)
- Campaign Type (One-time, Triggered, Recurring, Transactional, Journey, Relay) and;
- Channel (Push, In-app, Whatsapp, etc.) to get detailed insights into your campaign performance.

Read on to discover how to use Tags to speed up your campaign analytics and related activity.
1. Organize your campaigns based on your goals/objectives
While creating a campaign, keep the purpose of the campaign in mind. Is the campaign meant to:
- activate new users on your app – add New User Activation Tag
- recommend products to your customers – Catalog Recommendation Tag
- draw users to a seasonal campaign – Christmas Offer, Weekend Offer Tag
- engage recently acquired users – Re-engagement Tag
- bring dormant users back to your app – D15/D30 Inactive Users Campaign Tag, and so on
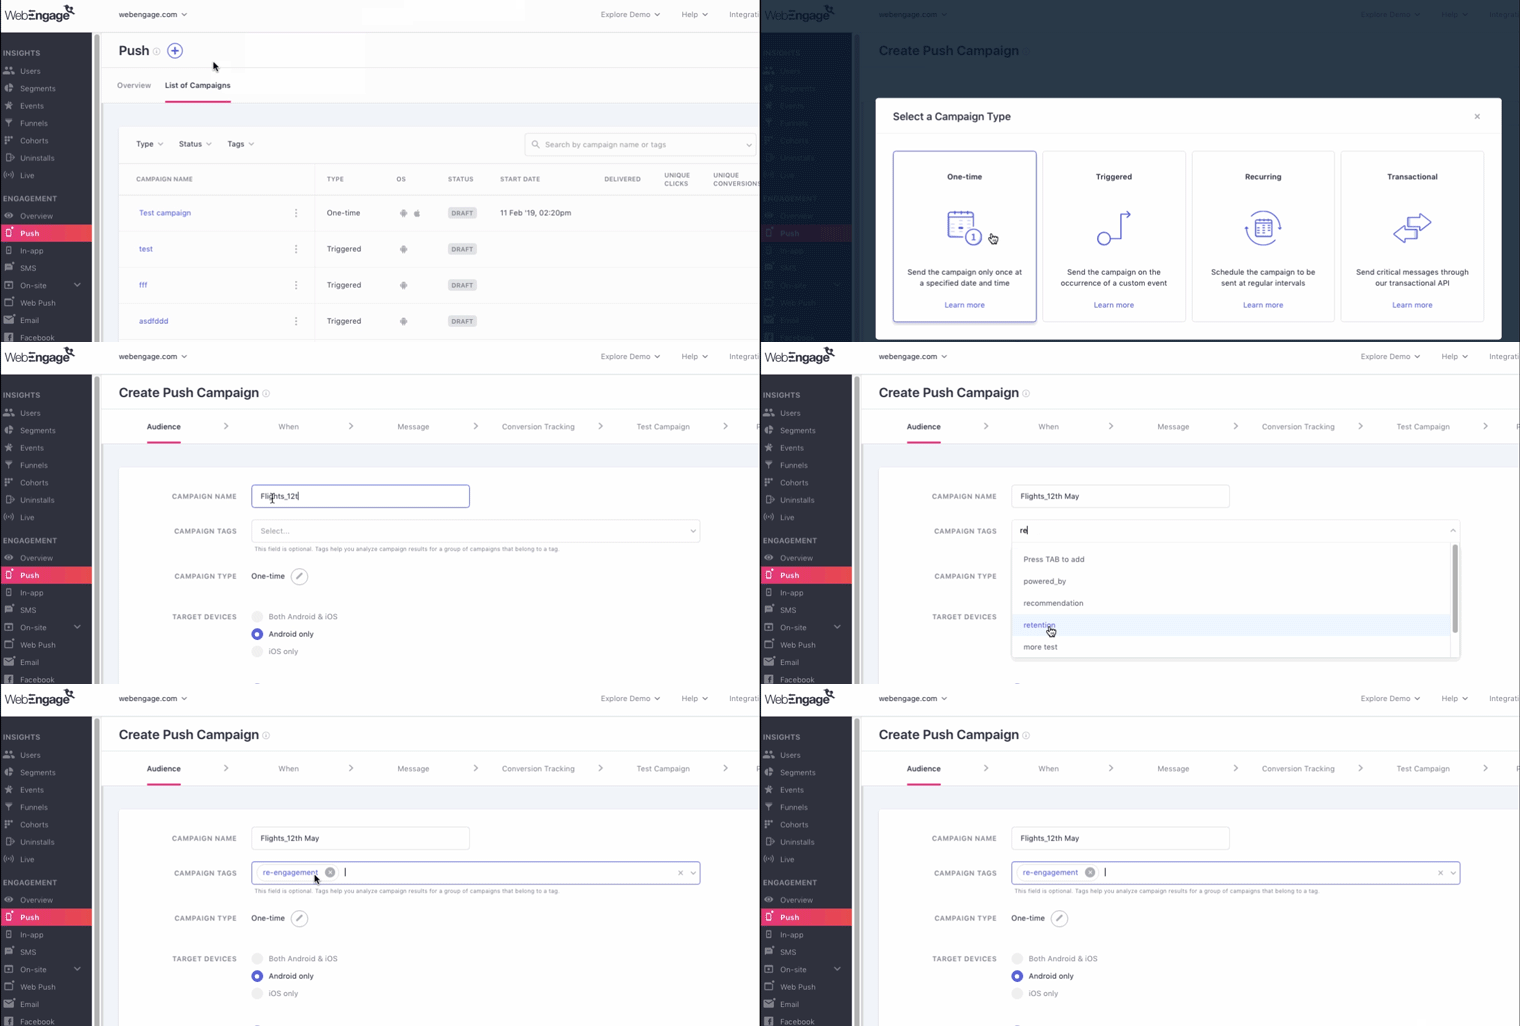
During campaign creation, you can see and assign the relevant Tags. Once you’ve applied a Tag to a campaign or journey, you can filter the Channel Overview page by that Tag to quickly find what you need.

Subsequently, a team lead may filter a subset of Tags to find and review campaign performance later. Once the entire project is complete, the whole team can pull up just the Tags found across multiple campaigns to draw inspiration during future planning and reviews.

Ankit Utreja
CTO, WebEngageWebEngage’s Tags for Campaign Analytics eliminates the need for extra work around campaign management and analytics in the long run. Your colleagues will thank you for taking the time to get it all right in the first go itself!
2. Analyze and compare the performance of campaigns across business verticals
If your business involves various categories and your marketers are sending out campaigns based on pure guesswork, you’ll probably find it useful to use Tags to compare the performance of your verticals.
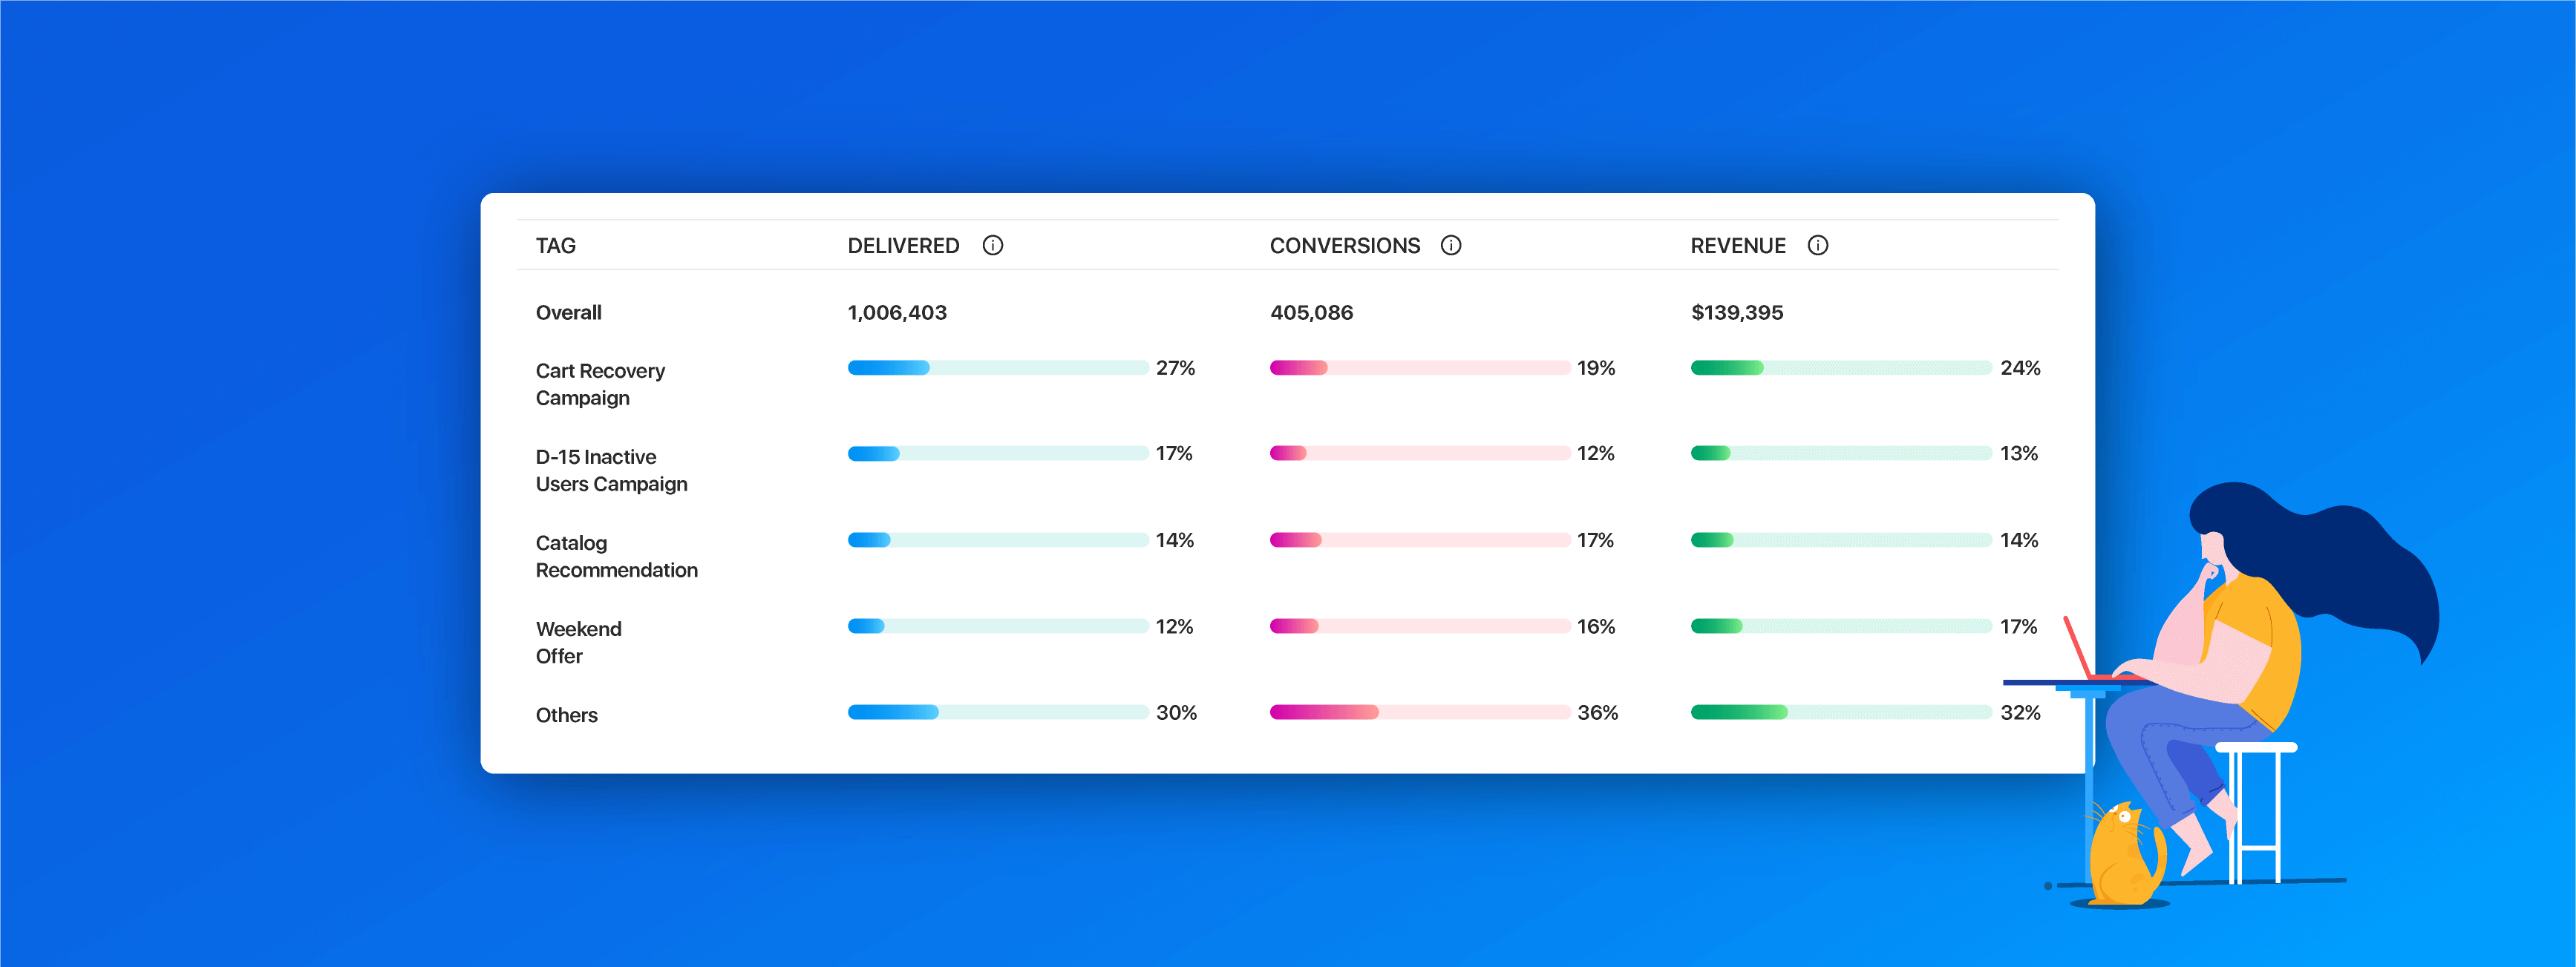
Under WebEngage’s channel overview, you can split your campaign performance by Tags (vertical name) to see which line of business brings maximum user engagement and revenue to your platform. Conversely, you can pin-point the non-performing verticals and update your marketing campaigns (optimize content, time of delivery, personalization, etc. to make them work).
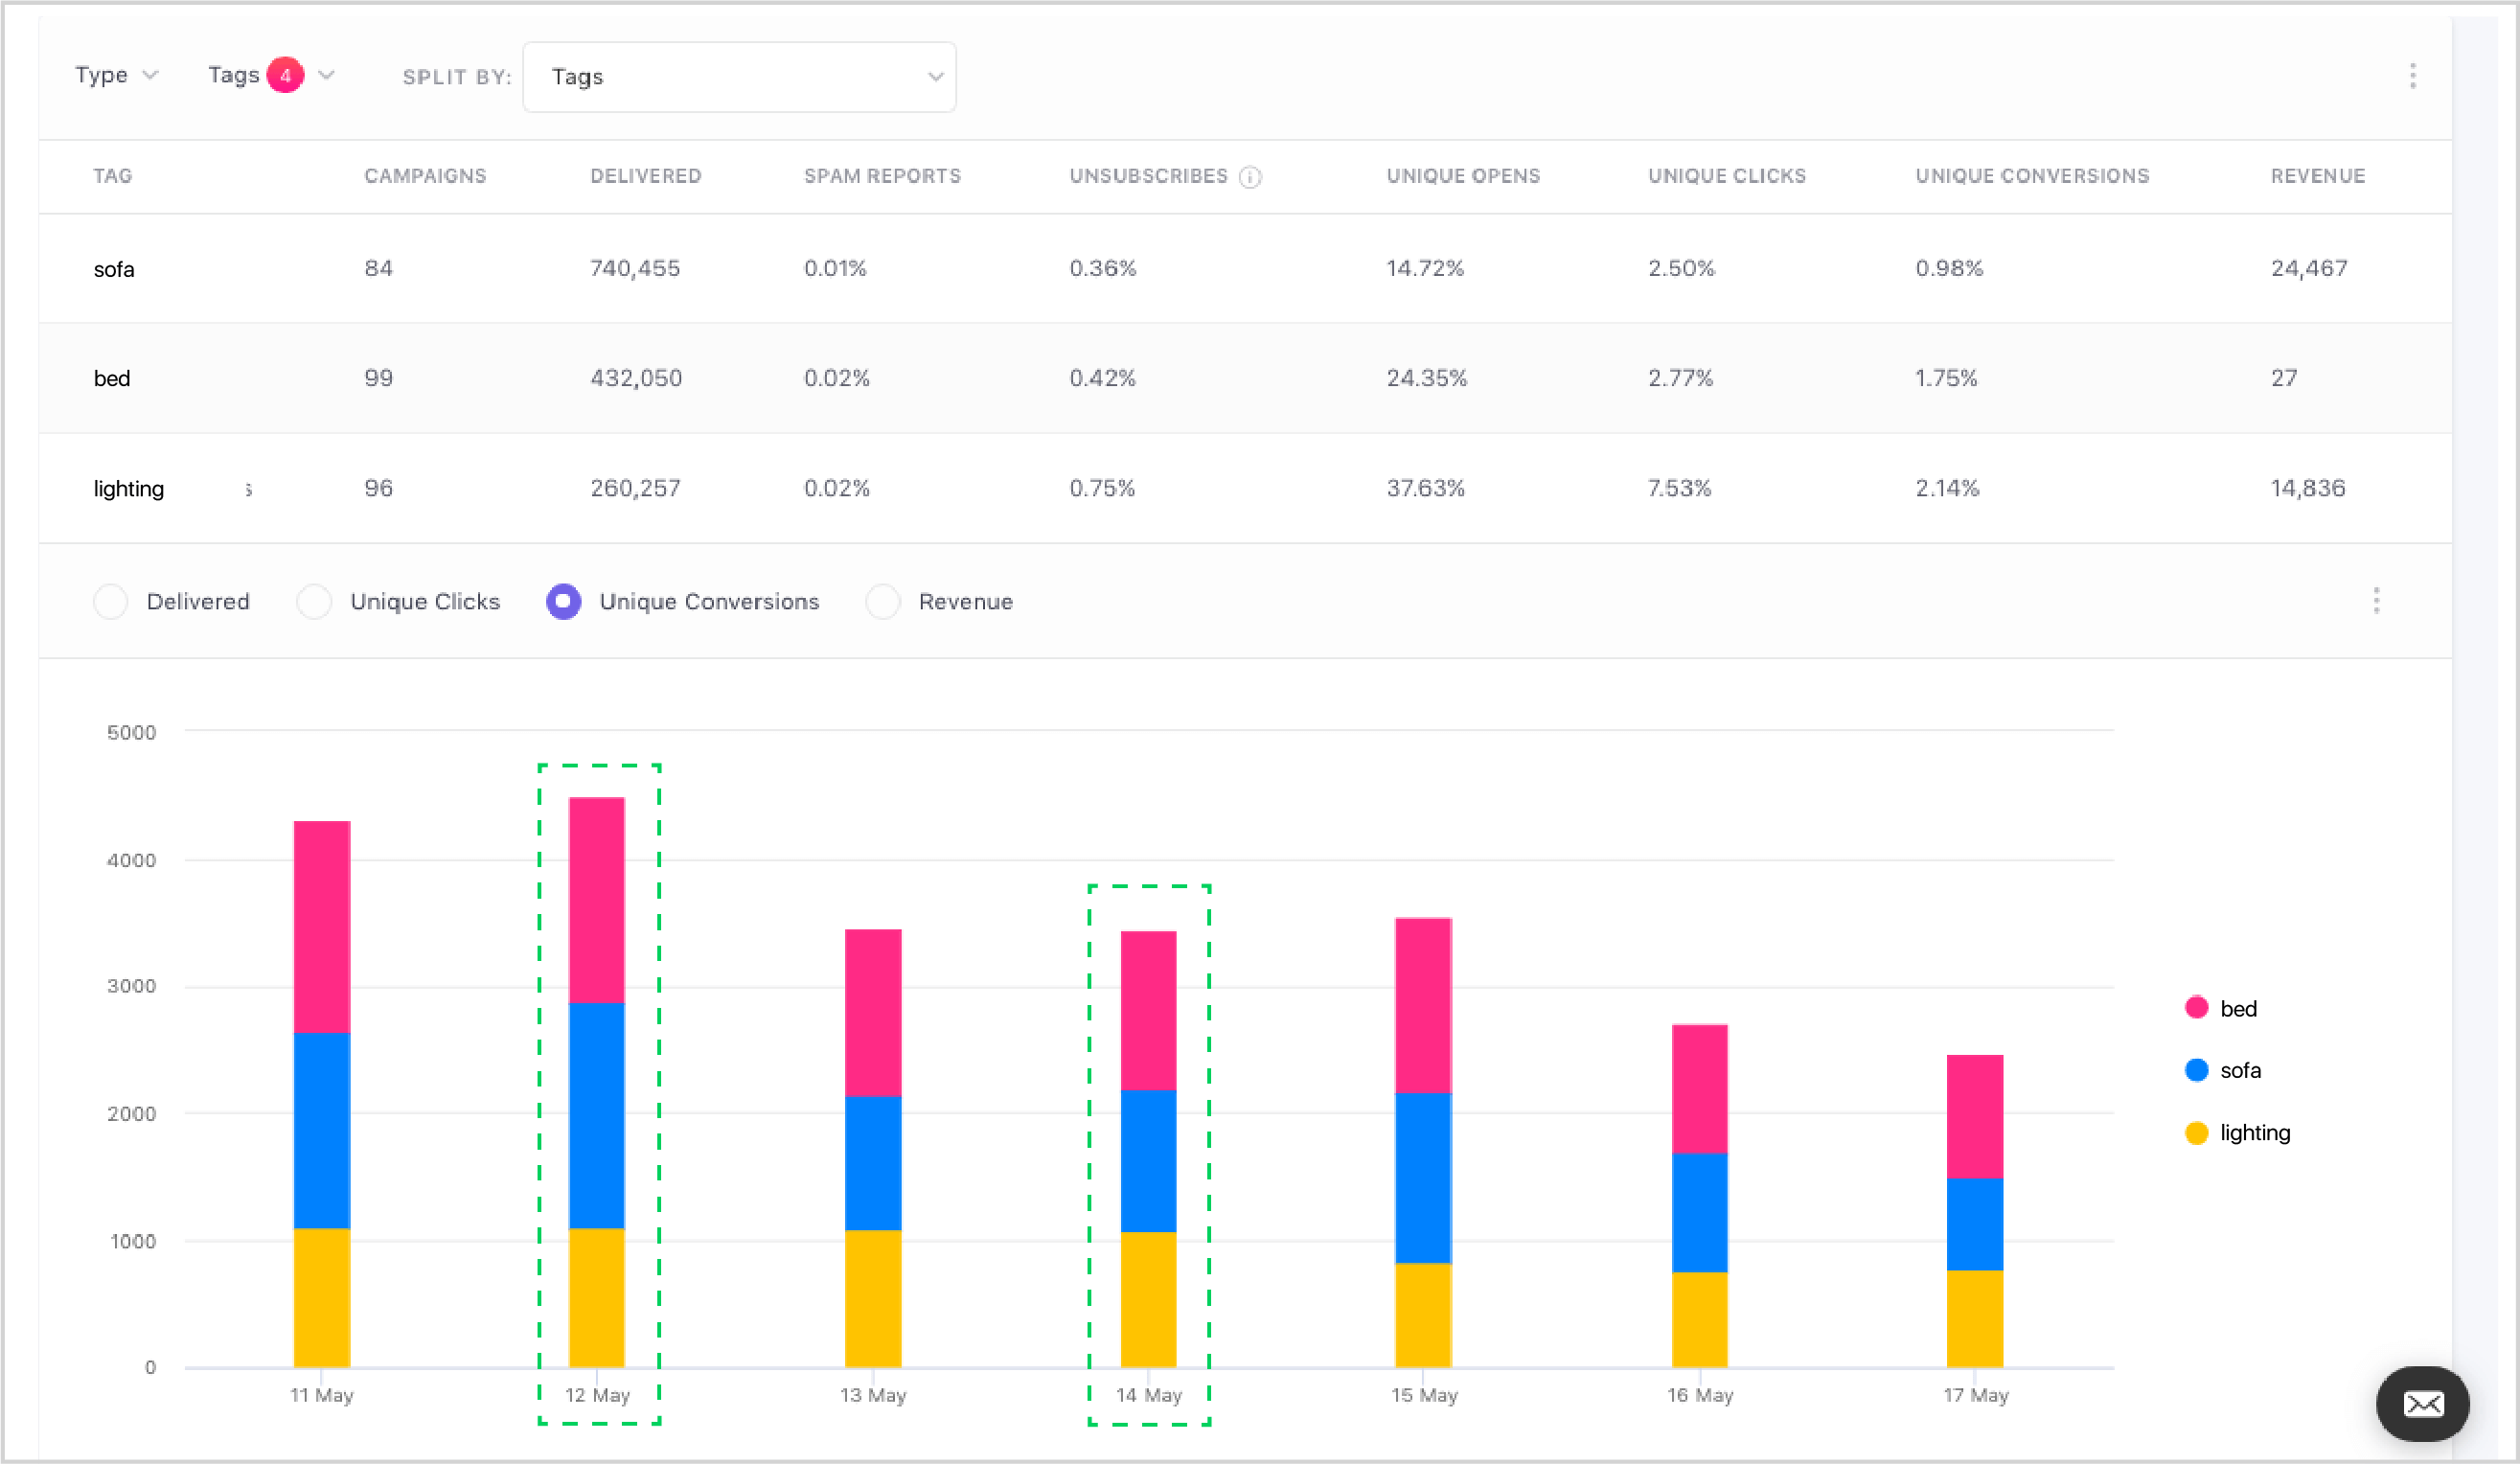
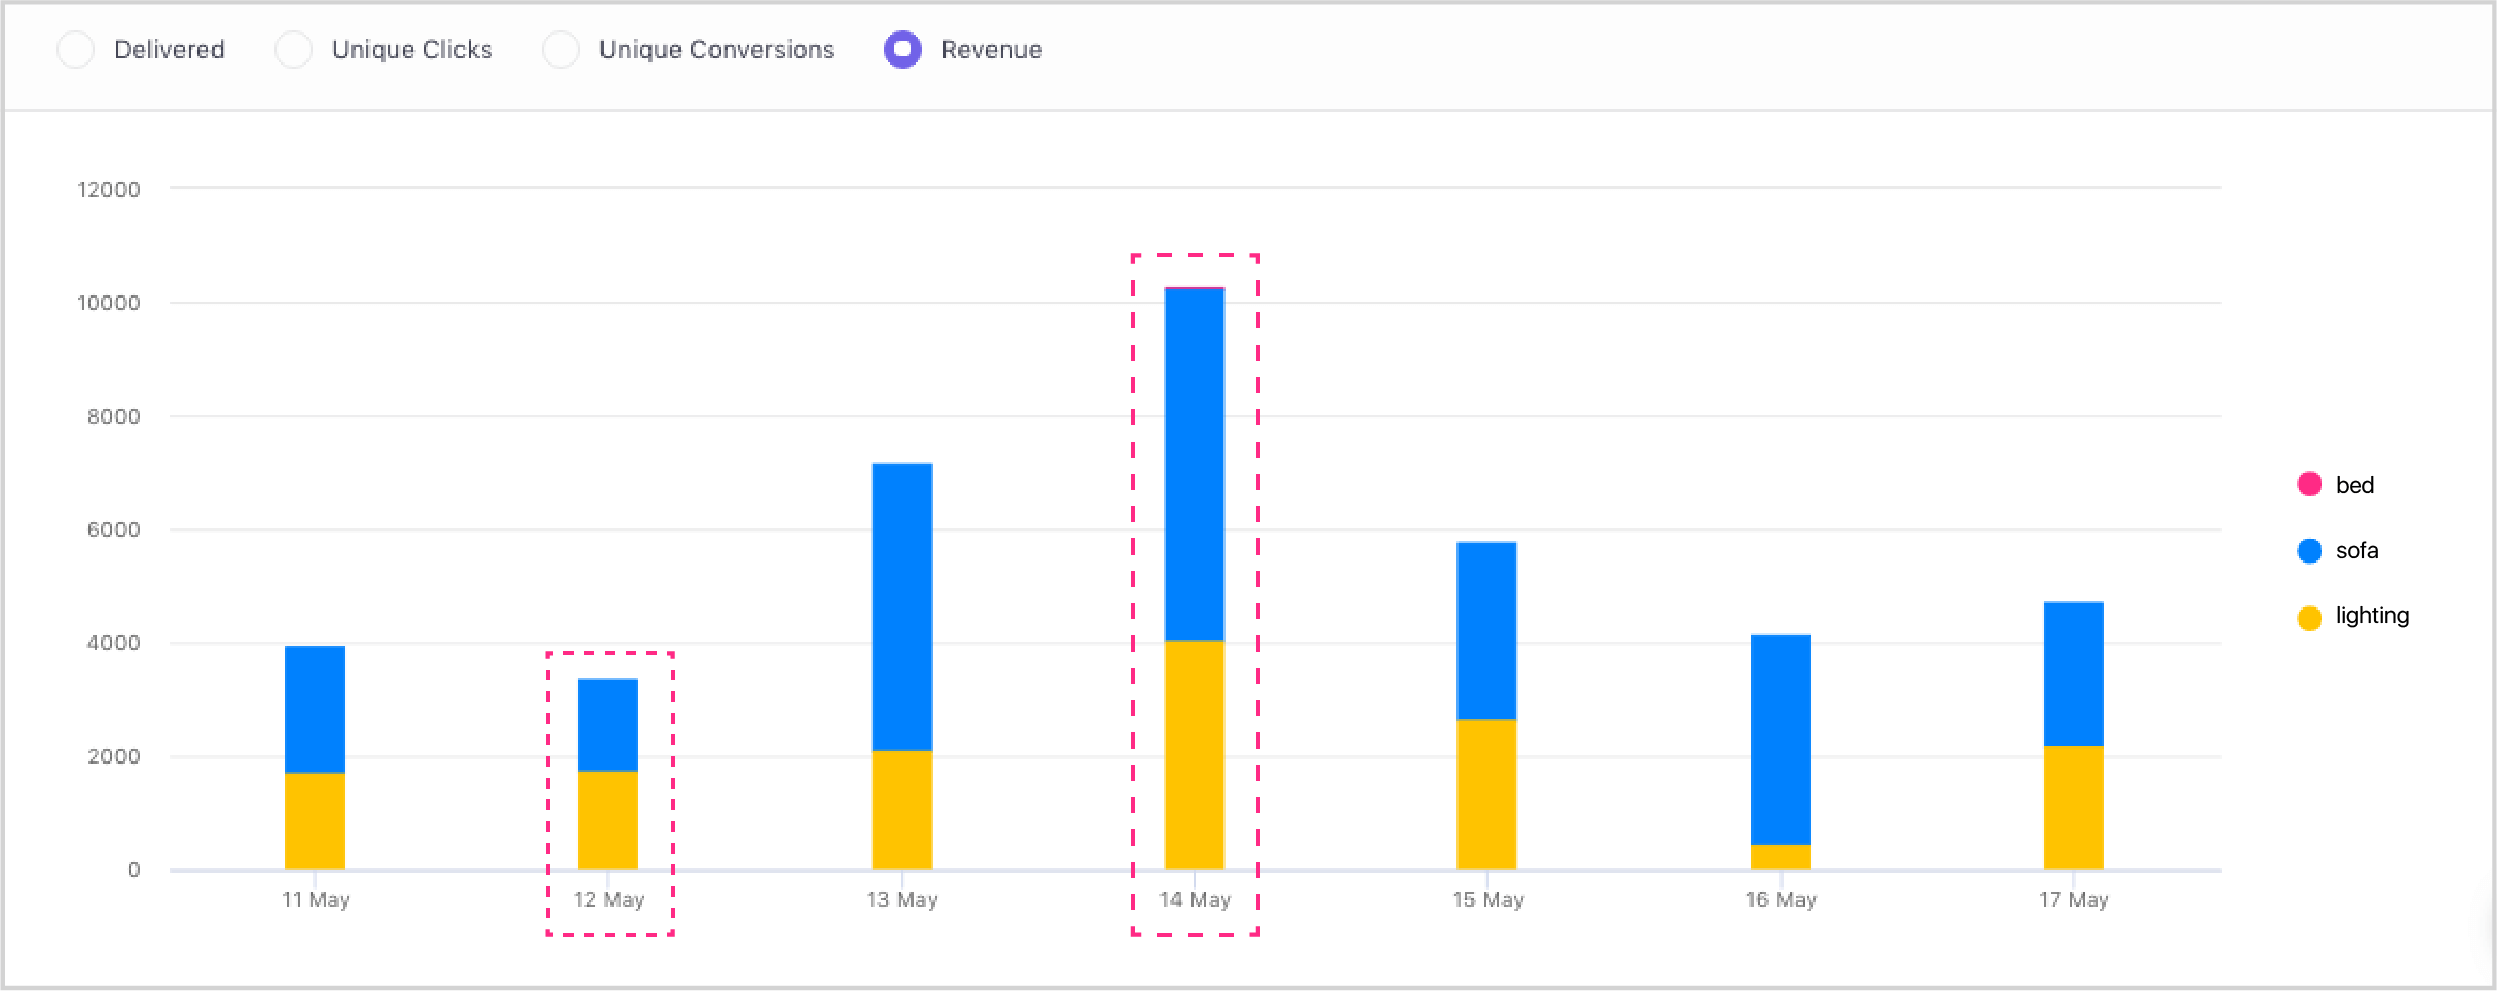
For example, if you are a marketer at an e-commerce furniture store, you can split your campaigns with categories or service lines like sofas, beds, lighting, and so on and compare the revenue share week-on-week. Once you start observing metrics that show the degree of involvement of your customers towards your product offerings, you will see a massive difference in the way you approach your engagement strategy for each of your product categories.
3. Discover the high-performing channels
Under the Engagement Overview, filter the list of campaigns or journeys based on your Tags to see your high performing channels for that particular LOB. For example, if you are an OTA, you can view the list of campaigns with the Tag, Flights, and see which channel brought the maximum engagement and revenue (flight bookings) over the last one month.
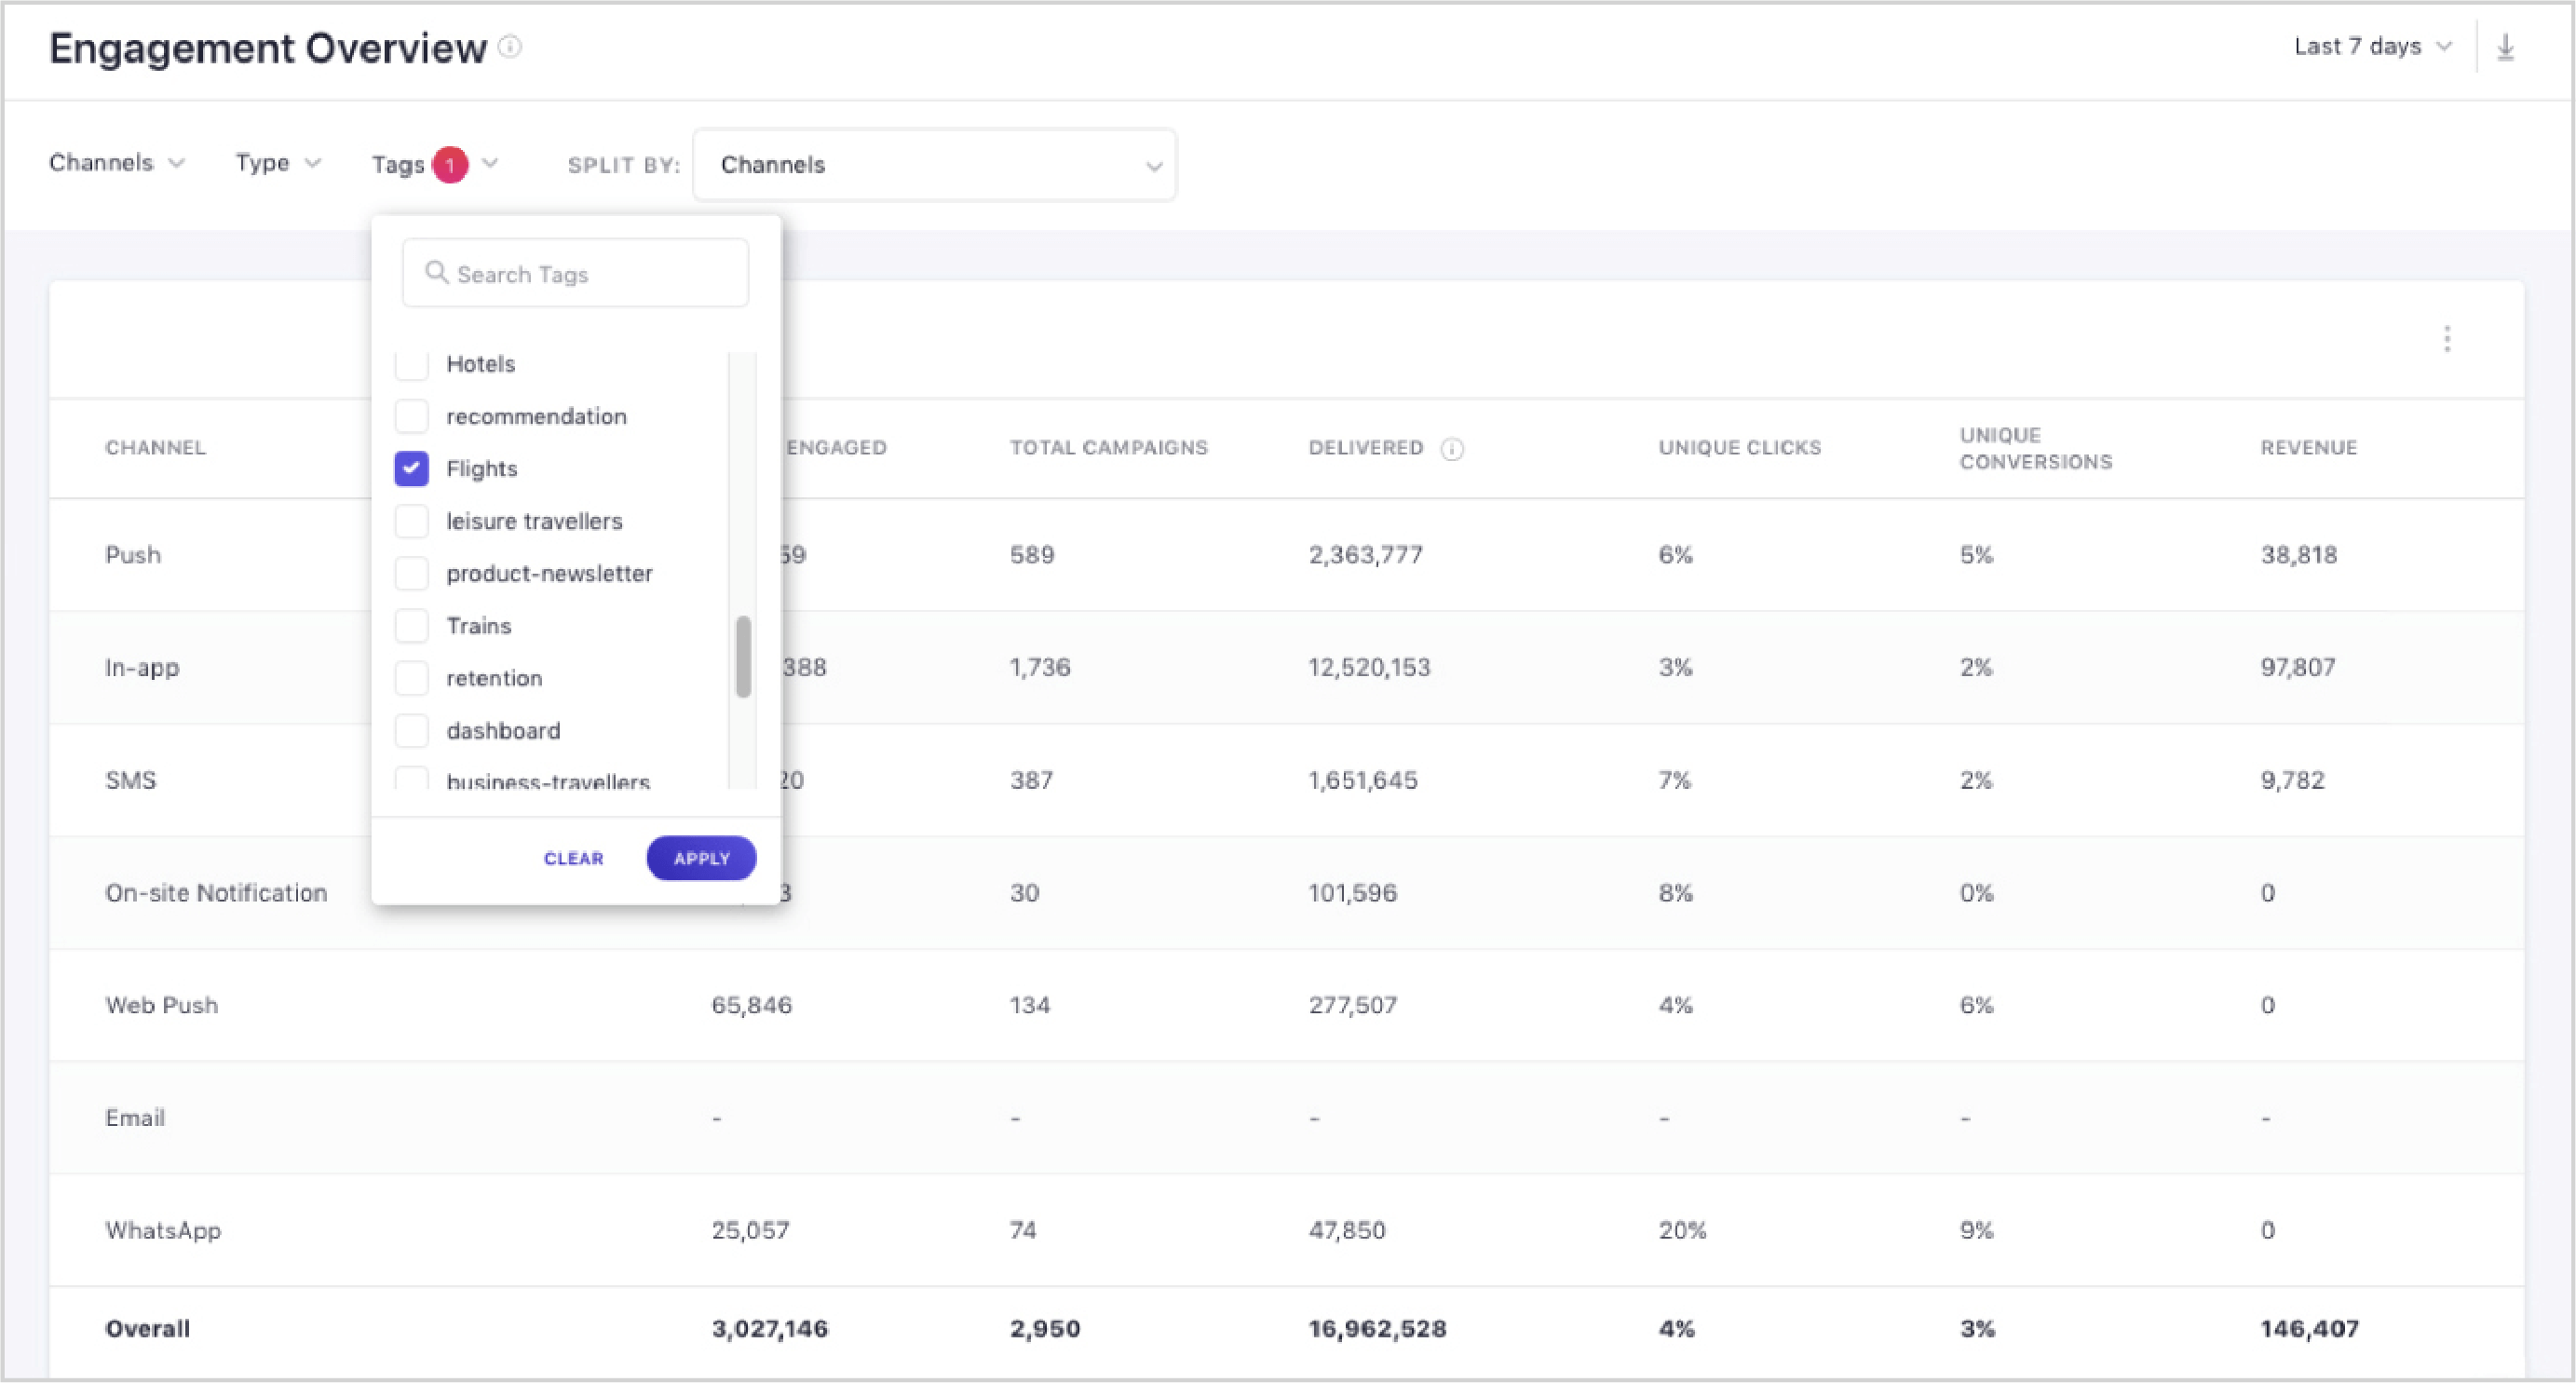
As seen in the visual above, maximum revenue was generated via the travel platform’s app as a result of Push notifications and In-app campaigns for flights.
However, even though more than 5x users were engaged via in-app, it only resulted in ~2.5x revenue, compared to Push. This is an alarming insight as it indicates a gap between your in-app marketing strategy and users’ expectations. This gap could be easily bridged by experimenting with various user segments, formats, delivery time, and so on.
You can dig further and see the performance of each channel at a campaign level. Once you compare your weekly data, you should be able to pick out some recurring trends. You can use this insight to automate the workflow or make changes to the under-performing campaigns.
4. Get a deeper understanding of your customers’ behavior
We know that Funnel and Cohort analyses are great for learning how users are interacting with your platforms over their entire user lifecycle. Complement your analysis by using Tags to quickly make sense of which segments of users respond to which type of product offerings or channels.
For example, if you are a high-touch product, like a mobile gaming app, you might have existing journeys to upsell a super-power, level-up, partner ad-campaigns, etc. Different user personas might react to your campaigns differently, and it can become difficult for you to keep track of the multiple data points and campaigns. By applying user persona Tags, you can quickly see which persona bought which product, when did they buy it, and using which channel or device. By comparing each data set, you can develop a detailed understanding of your customers’ journey.
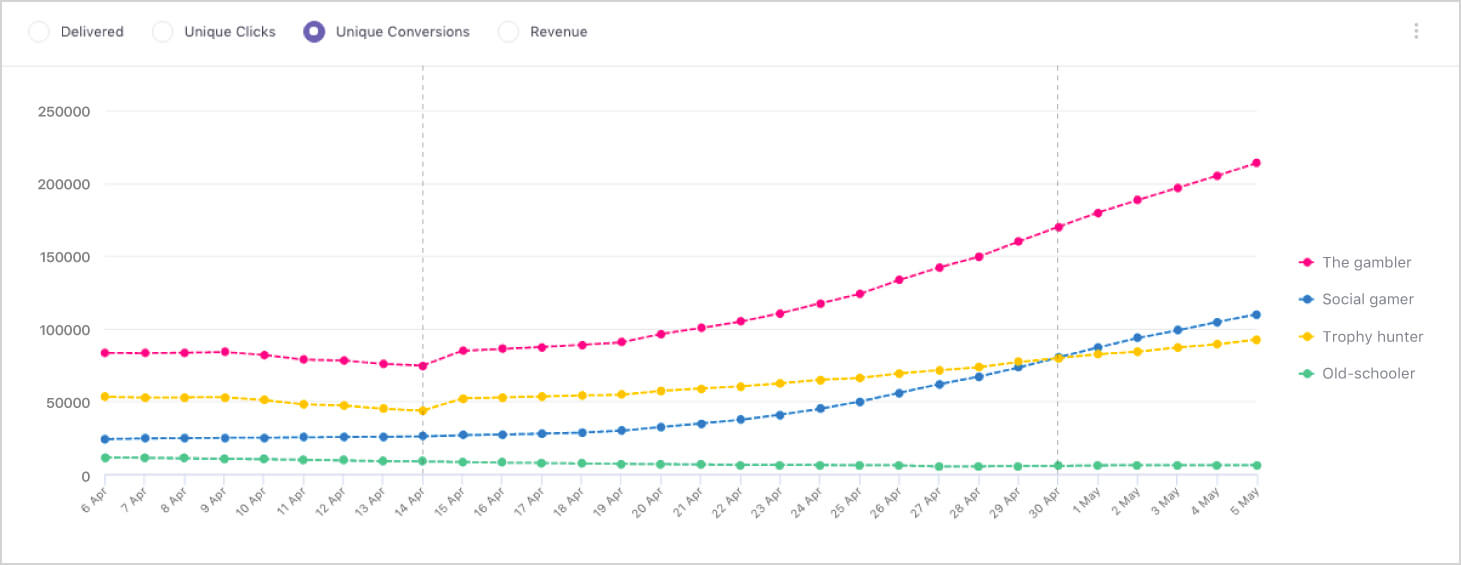
Use two Tags in conjunction (user persona, goal) to understand which customer segments respond to what kind of messaging the most. Use this insight to make product adjustments and develop new features that generate more revenue.
5. Enable agility across various teams
By using Tags in a way that makes sense for you and your product, product managers, and marketers like you can launch campaigns much more efficiently. In today’s world, where each team analyzes its data, Tag management gives you greater control over what you are launching, while giving you an opportunity of having all your data in one place.
Furthermore, PMs and marketers can use Tags to highlight some concerns and let everyone in the organization retrieve and analyze the information later. This way, teams maintain data quality and can trust all the data coming in.
6. Search for content faster and save time
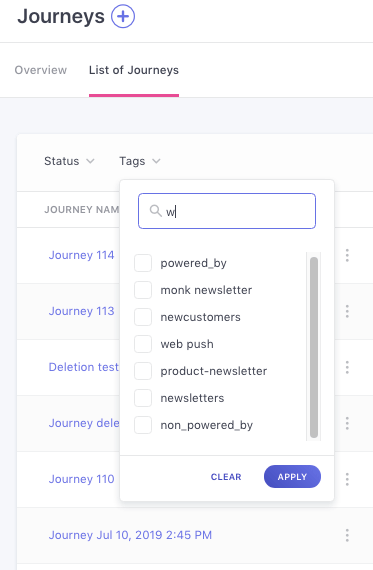
Find your preferred Tag in the dropdown of the Campaign Overview tab to quickly filter your campaigns by content that you are looking for. Choose the type of content that works best for your customers and replicate it for business growth.
To summarize, Tags are a highly effective way of organizing and accessing your campaigns on the WebEngage dashboard. They come with a special advantage of saving up your marketing and product teams’ bandwidth helping the teams focus on making better and instant decisions around user engagement and retention. Ultimately boosting your revenue!
Tags are now available on the WebEngage dashboard for all customers. They are also available in the Scheduled and Downloaded Reports section of the dashboard.
Try out our new feature and tell us what you think of it!
Do comment below or tweet to @webengage with your opinions. If you are new to WebEngage, request a demo from our Success team to learn more about this feature.




 Sanjay Mishra
 Harshita Lal


 Anmol Mewada